
Caonan to Shiding via Bijia Ridge
(台北天際線1B段:草湳/筆架嶺/石碇)
When I set off to complete this section of the TSLT, little did I know that it would be the last hike I did prior to catching COVID. Indeed, as I sit and write, I am enduring the first of seven days of quarantine after this morning’s test came back positive. Currently, my symptoms are very much on the mild side, and I hope it stays that way. More than anything, I feel anxious about it knocking the energy out of me in the longer term. I guess there’s not much I can do about it now though. Anyway, if I could have chosen any hike to be my last, pre-COVID hike, then I guess this was probably a pretty good one, all things considered.
DISTANCE: 11.8km – If you’re not too fussed about walking the TSLT in its entirety then you could cut off Erge Shan and head straight up towards the Bijia Ridge Trail.
TIME: 7-8 hours – I was quite slow for me because of the heat.
TOTAL ASCENT: About 380 metres (believe me, it feels like a lot more on a hot day). This walk sees you starting higher up and descending into Shiding, so the total descent is greater (close to 600 metres).
DIFFICULTY (REGULAR TAIWAN HIKERS): 4-5/10 – Overall, this is an easy-to-moderate walk for experience Taiwan hikers. It requires you to pay constant close attention to where you are putting your feet, but aside from a couple of spots, it isn’t particularly dangerous or difficult.
DIFFICULTY (NEW HIKERS): 6-7/10 – This definitely earns a spot for itself in the moderately difficult category. It has steep scrambles, some risky spots, and pretty relentless climbing and descending.
SIGNAGE: Signage is pretty clear throughout, not that it’s too necessary. Once you get up onto the ridge, you basically just follow it all of the way.
FOOD AND WATER: I drank 2.5L on a very hot day (around 34-35°C). Because of this, I also ate a higher than normal number of salt candies. Snack-wise, I just took a couple of small things like energy bars convenience store sandwiches and crisps.
SHADE: There is on and off shade, but if you’re sensitive to the sun you’ll need to keep covered. Due to the nature of the walk, hands-free options like hats and sleeves are far more sensible than an umbrella.
MOBILE NETWORK: Pretty clear throughout.
ENJOYMENT: This is a really fun walk. It’s exhilarating, it’s got great views, and it ends at a cool little town.
SOLO HIKE-ABILITY: I wouldn’t advise people to do this solo unless they’re already familiar with the area and/or know that they won’t freak out when faced with steep, trailside drops.
OTHER: You’ll definitely want to take gloves to keep your hands protected from all the ropes. And I’d recommend taking a hiking stick too so that you can save your knees from some of the impact on the way down.
TAIWAN 100 MINOR PEAKS: No. 17 (Erge Mountain)
ROUTE TYPE: Point to point.
PERMIT: None needed.
OPTIONS TO SPLIT THIS ROUTE: It would be possible to skip Erge Shan – just turn left at Caonan Great Banyan instead of right, but this wouldn’t shorten the walk by much.
Jump to the bottom of this post for a trail map and GPX file.
DIRECTIONS:
Numbers by photos refer to the GPS coordinates at the end of the post.

10:01 – I was the only passenger left on the bus by the time it had rattled its way around to Caonan bus stop. Fortunately (or maybe, unfortunately), the driver didn’t need to worry about being lonesome, since I was replaced by an elderly woman who got on just as I got off. Somewhat gallingly, the first forty minutes of my journey were to be spent retracing my steps back up to join the TSLT where it ran along the spine of the ridge between Maokong and Mount Erge. Anyway, griping aside, head up the road beside the bus stop towards Zhinan Road, Section 3, No. 187-213. (Only make sure to avail yourself of the bathroom facilities before you set off because there are very few toileting options once you’re up on the ridge.)


Take a right when you come to this junction where the old Caonan great banyan used to be. (I don’t know when it was cut down, except for that it must have been some time since I was last here a few years ago. I wonder if they’ll change the name of this tiny little bus stop now that the tree it’s named after has gone.) Then follow the track uphill along a stream until you notice this small trail branching off on the left. (1)

The one positive that can be said for climbing up this very steep slope in the blistering summer heat is that it’s nice and shady in a picturesque way. Before starting the climb, I’d dunked my towel in the stream and had draped the damp fabric around my neck, occasionally using it to cool my face. But by the time I got halfway up, I got the distinct impression that I was just wiping my face with grimy sweat.

10:40 – After a sweaty 40-minute climb, I reached the junction where I’d broken my previous stretch of the TSLT. From here turn left and continue climbing following the handwritten signs for Mounts Nanbangliao and Erge. (Along the trail which appears to be heading straight from where I took the above photo.)

Close to the next junction, I spotted this odd protuberance sticking out from the bottom edge of one of the stone steps. I’m not too sure of the exact species, but obviously some type of coral fungus.

This junction here is not really a junction. The lefthand trail tracks up an extra few metres to a triangulation marker before rejoining the main trail a little further along.


11:22 – A turn-off on the left just after an ugly stretch of concrete marks the entrance to the summit of Mount Erge. The peak marker, much like Mount Nangang, is hemmed in and cramped, and not much to write home about. But…


…just a few metres away you’ll find a pavilion/look-out shelter with some absolutely cracking views. In the centre of the righthand photo you can make out the saw-toothed and craggy profile of the Huangdidian Trail–where I’ll be headed on the next leg of this journey.
Turning away from the city to look south it is possible to make out a sliver of Feitsui Reservoir tucked into the folds of the river.

Leaving the pavilion, steps track down to a junction. The TSLT stickers seem to suggest going straight over, but after looking at both on the map (and having done previous walks in the area), I think it makes more sense to turn left and follow the steps all the way down to the road. The only reason you might not want to is if you don’t like deep and uneven steps, although if that’s the case, I think this is probably not the right walk for you.


11:40 – (2) When the steps join the road, turn left and follow the lane until it runs out. Here you’ll meet up with three more trails. (3) Take the one which heads up and to the right (above those two benches). As I approached the junction, I heard someone blasting dance music from their speakers, and was amused to discover a guy who must have been in his 60s or 70s. He made some comment about it being too hot, then wandered off as I made sure I was strapped up and ready to go.

The very first climb leading away from the junction is somewhat disingenuous. From here on out, do not expect to have your way smoothed by metal staircases!


11:49 – It isn’t long before you get your first rocky outcrop view–although, in fact, you would be able to blaze straight over this one without ever noticing if you failed to scramble up the slope on the left there.

11:53 – I reached the first (or last) of ten route markers that you’ll pass along the trail. They are almost all placed at junctions (as is the case here). Take the righthand path leading down and a little below the ridge. The map does seem to show another path leading closer to the top, but I’m not convinced that it still exists.
A little further along, I started to feel the heat get to me, so I stopped to cool down with iced coffee. (I honestly think this drink made the difference between me suffering heat exhaustion and being fine, albeit still very hot and sweaty – this, the salt candy and the cool towel managed to keep me from overheating.)

12:30 – Marker number nine isn’t a junction, but a rest area with shade and several benches. Since I’d just stopped to have my coffee, I didn’t take another break.


The trail is unrelenting in its up-and-down nature. There are only very brief stretches where you can walk at a normal speed, instead, you’re mostly either crawling your way up steep slopes or else cautiously climbing down. On a previous visit to this trail, I saw someone stumble at a point where things could easily have gone very badly if they fell, so I was not planning to cover the distance any quicker than felt comfortable or safe.

You’ll know you’ve almost made it to the twin high points of the walk when you encounter these steps cut into the ridge’s soft sandstone. (It’s so soft that even the rope handrail has carved its pattern into the rock.)

13:01 – At the top of the steps there is a side trail on the right leading to the southern peak of Mount Bijia. This peak doesn’t have as much of a view as the main peak, but I figured I’d already come this far, so why not pay it a visit.

Heading back down the main trail you’ll get to the saddle between the two peaks. The trail continues to the right, but it’s worth expending just a little more energy to reach the northern summit. It’s a short, steep scramble, but when you get there…

…the view is just spectacular. The summit is a narrow wedge of rock which tapers to a point facing straight towards Huangdidian. A lot of people like to have their photos taken here, standing with arms open to the heavens, but I was much more comfortable shuffling along on my butt.
Irritatingly, almost as soon as I made my way up here I heard the buzzing whine of a drone. It took me a bit by surprise because I hadn’t been aware of any other hikers at the peak, but I guessed they’d probably arrived just moments after me. It felt quite invasive to have it circle me, and I felt annoyed to be used as a prop in someone’s footage without having been asked. To my surprise (and increased irritation), after doing a couple of laps around me, the drone shot up, then travelled at least a kilometre further down the trail to the east.
Once it had buggered off I got back to enjoying the view, and I spent about 5 minutes up here before the heat started getting to me. Then, just as I began to make my way down, the buzzing annoyance returned. It provoked in me an instinctive desire to hide. I know it’s illogical, but it really is kind of creepy and intrusive to know that you’re being observed by an unknown operator.


Once you get back down to the saddle, the trail continues around the southern edge of Bijia Shan’s northern peak. From here as far as Ximaozi Rock the going gets a little bit more exciting. There are more ropes and plenty of sections where you really wouldn’t want to put a foot wrong.

The trickiest spot involves you having to hug your way around the side of this rock face (with a sheer drop into forest below you) before having to scramble down to more solid ground.

14:15 – At waymarker number seven I paused to have a snack before continuing. The trail takes 90° turn to the right here. (There is also a less defined trail heading left/straight which follows a groove in the mountain’s contours to track down to Shenggaokeng Road.)

After the tricky scramble of two photos ago, there are a couple more places where you have to clamber up rocks, but the rest of them are all more fun, less anxiety-inducing. The heat made the strenuous efforts required to climb them a bit challenging, but on a cooler day, this walk would be the perfect balance of effort, fun and beautiful views.
Shortly before reaching the next peak, there is a side trail on the right which tracks down to Neisizijiao – ignore it and continue to follow the ridge.

14:46 – Waymarker no. 5 sits in the clearing atop Zhizitou Shan (炙子頭山). I stopped here for more snacks, even though I’d not long had something. The trail heads straight over and is pretty obvious, but there is another one on the left, so just make sure you’re heading the right way. (The lefthand trail would take you down to Shenggaokeng Road, just like the trail at waymarker no.7.)

Zhizitou Shan has no views, but just a short way beyond it the trail gives you its first view of freeway number 5 as it makes a brief appearance between tunnels.

The trail after Zhizitou Shan still follows the ridge line, and it does have some steep scrambles, but by and large, it’s easier going than what’s gone before. Somewhere just before here, waymarker no. 4 is placed at another junction that requires ignoring. (It goes down to Shanyang Cave, somewhere that’s been on my “Want To Visit” place for a while, then heads on towards Wutuku.)
At one point I found myself on a rocky overlook with views over the next prominent point on the trail–Ximaozi Rock.


By this point, I was definitely aware of my legs being a little tired. I had been working my way through a bag of salt candy, taking one every thirty minutes, but despite this, my muscles were starting to protest at the relentless combination of heat and exertion.

15:15 – Ximaozi Rock (西帽子岩, or West Hat Rock) is marked by a gnarled rock that’s in the process of being consumed by tree roots. As you approach it from the east, there’s an interesting arch-type feature formed by a couple of stacked boulders.

A rare, relaxing portion of the trail where you’re not at risk of falling off on either side.

15:24 – Waymarker no. 3 marks another trail on the right. A faded, handwritten sign lists three places that can be reached this way: Xibianliao Shan (溪邊寮山), Moru Lane Old Trail (摸乳巷古道) and Shanyang Cave (山羊洞). As with the previous side trails, ignored them and continued along the ridge, but… I definitely want to come back and maybe do a little loop from Wutuku, up via Xibianliao Shan, to the ridge then back down to Shanyang Cave. (It’ll have to wait until it cools down a bit though, because the Google Maps reviews for the cave ALL talk about how many mosquitos there are.)


15:33 – I arrived at the pylon about twenty-five minutes after I’d first seen it. This is where you find waymarker no. 2. It’s kind of simultaneously impressive and terrible to see the wires spanning the valley below you.

By this point, I was a lot closer to the freeway, and the noise of the traffic was encroaching more obviously on the quiet of the trail.

Two very different methods of travel are visible in this picture. It’s kind of funny that I found myself looking at the freeway from the trail, just as I always look up at this ridgeline when I’m travelling on freeway no. 5.

A pretty bug on one of the trees beside the trail. iNaturalist thinks it is probably Eurostus validus, or in Chinese, the rather lacking-in-imagination “碩蝽,” which translates as “large bug.” (It was pretty large.)

16:15 – Finally, I reached waymarker no. 1. It sits at the point where the trail leaves the ridge and starts to descend towards the river. There are actually a couple of trails which leave the clearing, but the one taken by the TSLT goes towards the left. (It’s also the more defined of the two trails, so it should be easy to pick the correct one.)

The further down you go, the lusher the plantlife beside the trail becomes. There is a lot more moss, and a greater variety of ferns down here compared to up on the ridge.

I heard the noisy protestations of the farmhouse dog before I saw the farmhouse. This traditional sanheyuan has been in the same family for five generations and is still occupied by the patriarch of the third generation, along with at least one of his children. The old man ambled out to see what had got his dog all fired up, and proceeded to have a conversation with me in which he spoke only Taiwanese and I replied in only Mandarin. (This was one occasion when I found myself grateful for the fact that the kinds of questions I get asked are mercifully repetitive. Are you hiking alone? Where did you start? Where are you going? What do you do in Taiwan?)
Pre-pandemic, this old chap used to put out huge pots of tea for weekend hikers, and maybe he still does, but I passed through on a Monday so I can’t be sure.

16:39 – The trail leading down from the old farmhouse is wonderfully bucolic. Slender stems of bamboo frame a shaded valley, and a stream runs beside farmland. I do wonder what family life is like for the people who live up there though. I can’t imagine the oldest family member being easily able to make the journey into town if he needs to.


At the very bottom of the farmland, take a right turn towards the water. You’ll know you’re almost back on the road when you reach a land god temple that stands slightly raised above the trail. A little further down, I spotted a cool pool through the trees to my right, and I was sorely tempted to jump in, boots and all (fortunately, sense prevailed).

17:01 – (4) When the trail finally emerges onto the road, turn right and walk towards Shiding Old Street. You can stay on the road the whole way if you like, but I prefer to take the steps leading down to the water level.


Downstream, the towering concrete structure of the freeway seemed to defy gravity, while looking upstream I could more-or-less make out the end of my day’s journey.

This is why I will always choose to walk beside the river over walking along the road. As you near the settlement of Shiding you are treated to this pretty view of the buildings crowding in along both sides of the river, and all the while the flashes of sunlight and silver fish scales play across the water. (Although sadly, it’s a bit smelly–it seems several establishments along the banks dump wastewater directly into the flow.) Watch out for steps taking you back up to street level either just before or just after following a right turn in the water, either will get you back on the road.


17:22 – Once up and back on street level, follow the bridge over the river, then turn left onto the main road and cross another tributary on your way to the bus stop. I made a beeline for the corner Hilife store, where I bought something cold to tide me over until the cool, air-conditioned bus arrived.
GETTING THERE
Google Maps address: This section of the TSLT starts at Caonan and ends at Shiding. If you really wanted to use your own transportation, there’s plenty of roadside parking close to the Caonan Great Banyan bus stop and plenty of people park at the side of the road in Shiding too.
GPS location:
- Trailhead close to Caonan Great Banyan – N24 58.060 E121 36.480
- Trailhead close to Erge Shan – N24 58.100 E121 37.230
- Trailhead at the start of the Bijia Ridge Trail – N24 58.150 E121 37.230
- Trailhead at the Shiding end – N24 59.488 E121 39.250
Public transport:
- To arrive at Caonan, take the brown line to its southernmost terminus (Taipei Zoo Station), head for exit one then cross over to the bus stop in the middle of the road (not the one nearest to the station, you want the one which faces the entrance to the zoo). From there you can board the BR 15 (棕15) or Maokong Left (貓空佐線) and ride them as far as Caonan. Buses come every 20-30 minutes.
- To return, board the 666 bus at Shiding and ride it back as far as Muzha (where you can transfer to the brown line) or all the way to Jingmei (where you can hop on the green line).
Further reading: To do the walk in the other direction you can follow this post most of the way (it takes a different route down from the end of Bijia Ridge Trail to Caonan.
Nearby trails:
- Fengzilin Shan and Niaoyue Shan
- Huangdidian
- Tamsui-Kavalan Trails – Shenkeng to Wutuku
- Tamsui-Kavalan Trails – Wutuku to Pinglin
- Yue Shan Hu Cliff Trail
TAIPEI SKYLINE TRAIL SECTION 1B – TRAIL MAP
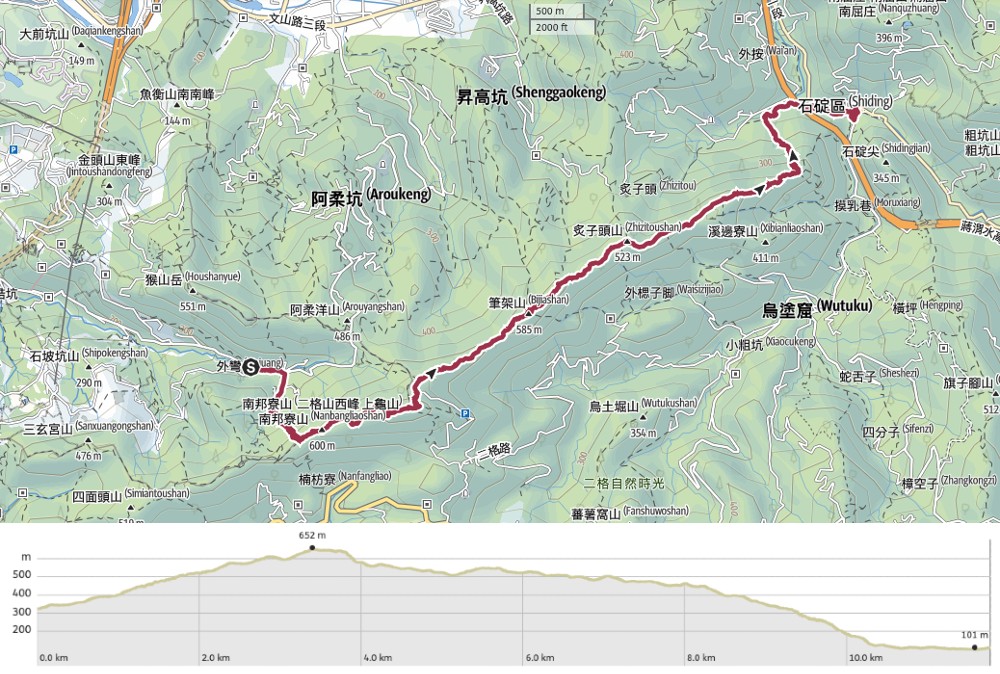
GPX file available here on Outdoor Active. (Account needed, but the free one works just fine.)
If you enjoy what I write and would like to help me pay for the cost of running this site or train tickets to the next trailhead, then feel free to throw a few dollars my way. You can find me on PayPal, Buy Me a Coffee or Ko-fi, (and if you’re curious about the difference between the three you can check my about page).
