New Taipei’s Most Adventurous Day Hike
NOTE: NOTE: (December 2024) — It appears that some hikers are now finding their own unofficial routes around the Teapot Mountain closure, so it may be possible to complete this route despite it remaining officially closed.
(October 2024) — Due to landslide closures on the Teapot Mountain Trail, it is currently impossible to follow the trail as it appears here. Diversions may or may not be possible. (If you find this information to be no longer accurate, please do drop a line to let me know. With the hundreds of trails listed on the site, it’s getting increasingly hard for me to keep on top of things like this.)
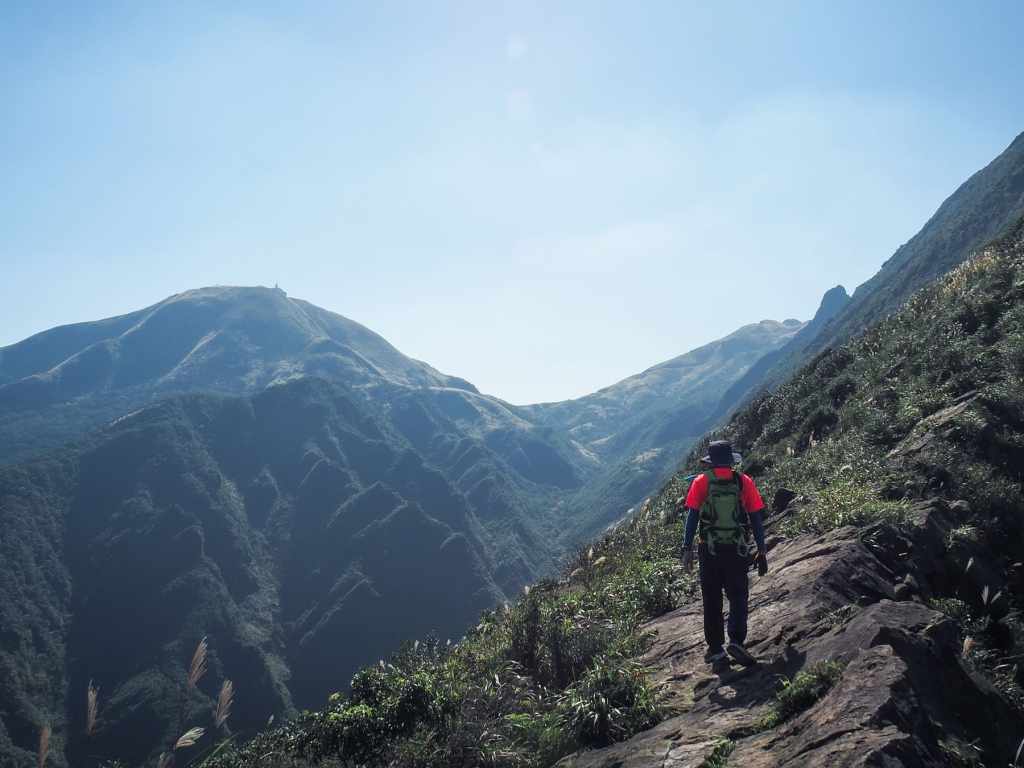
Stegosaurus Ridge has to be one of the most exhilarating day hikes that you can do in northern Taiwan. It offers spectacular views of grassy slopes, rocky ridges, and bright blue coastal waters, and is very much a full-body workout kind of hike. It is also not a hike for everyone.
Part of the appeal of this trail is the rugged, exposed ridges and sections of climbing that require you to haul yourself up using fixed ropes. It is very physically demanding, dangerous in parts, and there are no shortcuts or easy ways out if you decide halfway that it’s too much. So, if you’re not feeling in top physical shape, can’t arrive at the trailhead before 10 am at the latest, or get queasy about being up high, then this is not the hike for you. Every year, there are numerous stories about people requiring rescue, and you really don’t want to be that person (especially if you’re foreign, young, or female—these groups all seem to get judged far more harshly by local media for making mistakes).
Once you’ve got onto the spine, it’s not that complicated to figure out where you’re going, so most of the photos are here to show you both why you should and should not do this walk. Personally, I absolutely love it, but this is one that you need to think carefully about before deciding to take it on.
DISTANCE: About 6.7 km. It would be possible to extend this by looping back down to the coast, but that’ll be a very long day.
TIME: 5-8 hours – I walked this in about 5.5 hours at a relatively steady pace. If you’ve not done this type of walking before, do not underestimate this. I also would not advise starting this walk any later than 9:30-10:00am unless you are certain in your abilities because you really don’t want to be on this trail after dark. People are often rescued from Stegosaurus Ridge because they started to late and it got dark, or they tried to take a shortcut down and got lost. Starting early will help give you enough time to get down.
TOTAL ASCENT: Around 740 metres.
DIFFICULTY (REGULAR TAIWAN HIKERS): 6/10 – This is tiring both physically and mentally even for a regular hiker. If you’re often to be found on Taiwan’s trails, this is probably a difficult moderate hike.
DIFFICULTY (NEW HIKERS): 10/10 – For people new to hiking in Taiwan, this is probably a bit too much. I’d advise trying your hand at a few shorter and easier versions with climbing like Scissors Rock or Bijia Ridge.
SIGNAGE: There are lots of hand-written Chinese signs, but little or no English signage.
FOOD AND WATER: 1.5-2L – I did not pack enough this time. I drank all of my 1.5L on a cool and breezy December day and was probably mildly dehydrated by the time I arrived at the end of the walk. If you have one, this is a good walk to use a hydration pack on because you won’t want to be removing your pack every time you need a drink. You will definitely want snacks to replenish your energy levels, and if you’re a sweaty Betty like me, I strongly advise salt candy to help make sure your muscles have the salt they need to keep performing. You might find some vendors at the trailhead, but don’t count on it. You should bring everything you need with you.
SHADE: The ridge is extremely exposed. If you are sensitive to the sun, you will need hands-free cover. I had long sleeves and a hat with neck protection. (Even so, I am currently rocking a pair of sunburnt wrists from where my sleeves failed to line up with my gloves.)
MOBILE NETWORK: Weak in some patches, especially when you’re not on the ridge.
ENJOYMENT: 100/10, all the gold stars, etc. If you’re prepared and in good physical shape, this is a top-notch trail and will be an experience you remember for a very long time.
SOLO HIKE-ABILITY: I would not advise doing this hike on your own, and definitely not if you’re visiting it for the first time.
OTHER: You will need gloves for this. I prefer the 3M gloves that you can buy from everything stores. You might also find that a hiking stick is helpful for balance in some sections, although it would need to be a collapsible one that you can put in your pack for sections where two hands are needed. Also, in addition to needing lon sleeves to protect yourself from the sun, you will want to cover your legs to avoid getting sliced to ribbons by the spiky grasses and thorned bushes that line the trail. (And no jeans unless you want to experience maximum discomfort.)
BATHROOM FACILITIES: There is a toilet block by Nanxin Temple at the start, and another at Quanji Temple at the end of the walk.
GOLDEN RIDGE LINE ROUTE: Golden Ridge Line Number 5 and part of 6.
ROUTE TYPE: Point to point.
PERMIT: None needed.
Jump to the bottom of this post for a trail map and GPX file.
DIRECTIONS:


There are numerous entrance points for the trail network around here, and over the years, different points have gone up and down in popularity. The one I used on an earlier visit is now entirely impassable, and this entrance by Nanya Fishing Harbour is currently the most popular. Turn rightish past Nanxin Temple’s spirit money burner and past a row of restaurants.


You’ll need to cross a concrete bridge and walk to a pavilion that marks the start of Nanzilin Trail. Generally, you can just follow the Nanzilin Trail for the first portion of this trail, but when I visited, it was closed for renovation, so I had to use an alternate route. The metal sheeting in the second image here is the Nanzilin Trail entrance, but there is a second, fainter path which cuts through farmland on the left.

The path is clear, but it is unclear whether you’re just on a farmer’s track or a hiking trail. In fact, it’s really not so easy to spot the correct route at first glance because there are many farmer’s routes weaving in and out.

You will need to cross over a small stream once. It was shallow enough to do without getting wet feet. DO NOT cross over the stream a second time. When I visited, the second stream crossing was by far the more obvious route, so I went that way before realising I’d made a mistake and had to double back. Instead, keep the stream on your right and look for another faint path on your left. I was not the only person to make this mistake. A hiking group of about eight people (including one guy who insisted that he’d walked this route many times and knew the correct way), and another solo hiker called Max all ended up in the wrong spot along with me. The correct path has a couple of hiking tags to let you know you’re going in the right way, and heads through netted farmland.


After just a couple of minutes, the path emerges onto a muddy track and you need to turn right to head inland towards the hills. Look out for this turn-off on your left at the outer edge of a sharp bend. It’s marked by hiking tags and a little red and white trail sign pinned to a tree on the opposite side of the track, but if you’re not paying attention, it would be easy to miss.

The triangulation marker for Mount Nanzilin Southeast Peak sits in a shaded clearing.


The path here is clear and easy to follow, and there are frequent hiking tags and occasional signs to direct your interest to features like these crumbling walls of an old house. I found myself walking with Max, the solo hiker who I met in the same wrong spot. Usually, if I’m solo hiking, I resent picking up company, but Max ended up being a pleasant hiking companion.

I spotted an unusually chill muntjac just upslope from us. It neither barked nor turned tail and ran once it spotted us. Instead, it just kind of sauntered up and over the ridge.

This is the point at which the “normal” trail from Mount Nanzilin joins back up with the route I was taking. The Nanzilin Trail joins from the right and the route onwards to Banping Stream and Stegosaurus Ridge is on the left.

Just past the junction, we got our first proper view of Stegosaurus Ridge.

At the next junction, take a sharp right and head downhill towards the sound of Banping Stream. (The lefthand route heads up to the striking short ridge of Baoluo Peak.)


The descent is steep and assisted by some fixed ropes. It also offers one absolutely enchanting view of the stream. In warmer months, this is quite a popular river tracing spot.

Once you reach the water, turn right and walk downstream along the bank for a short distance until you make it to the crossing.

Even after a dry(ish) spell, the stream crossing was deep enough to mean I couldn’t cross with dry feet. I decided to take off my shoes rather than endure several hours of damp feet and luckily, the rocks were not even a tiny bit slippery.

The fun starts almost as soon as you reach the far side of the water.

I think that first sawtooth ridge is Baoluo Peak (保羅尖).

Looking right, you can see down to the coast and the old trailhead that I used on my previous visit.

On the left you can see Banping Stream cutting through the landscape to Dagui Waterfall. For a lot of the walk, the distant roar of the water could be heard.

This is the first of two points where the trail dips down to cross over intersecting paths. They’re almost impossible to photograph clearly, but in both cases, you just need to keep heading straightish towards the unmissable form of Stegosaurus Ridge.

Given how unmistakable the ridge is, there is only one clear way to go from here. We watched this group spend about 10 minutes taking photos here (the famous “start of the ridge” photo op spot) before they headed down. We met them at the second of the two interections at dips.


These two photos were taking from the same place that the people in the previous photo were in.

We took a snack break here before starting our ascent of the Stegosaurus’s spine.

Interesting patterns that seem to be made of iron. There were quite a lot of iron deposits, but not so many that were as pretty as this.

At some point, the walk segues into its next phase. This is not quite as relentlessly steep as the earlier climb.


It also passes through more grassy and slightly overgrown areas.

As you climb higher, you’re able to make out more and more landmarks. Down by the coast, the Yinyang Sea does its thing, and Mount Keelung is a constant presence.
I somehow managed to not take a photo of 381 Peak (381峰—so named because that’s how high it is). We stopped here to have another quick snack break.

You will want to take your time so that you can enjoy the feeling of being on top of the world.

An incongruous crab’s claw. I can only imagine some bird (perhaps one of the many black kites that visit Keelung’s coastal waters) brought it up here for a seafood dinner with a view.

This narrow slit between two rocks is another well-known photo spot along the way.

This was one of the two most critical sections. It’s very hard to see from the photo, but the trail narrows to a point where the only real way across it is to straddle the rock and bum-shuffle inelegantly for a couple of metres with drop-offs to either side.

Here, the trail we were following passed another route joining from the right. Head straight over and up along the ridge.

Keep watching the trail in front of you and it will be easy to spot this steep rope section, but once you’re almost upon it, it becomes blocked from view, and unless you know where you’re meant to be going, it’s possible the route doesn’t seem all that clear. (My temporary teammate missed it at first glance.)


As we got higher, we were able to see where we’d started the walk from (the buildings just right of the small hill in the righthand photo).

We made it to 55 Peak (555峰—also named for its height) about three and a half hours after setting off. This was where our temporary hiking group broke up. I wanted to continue up to Teapot Mountain, but Max was planning to take another route from here. We exchanged line contacts and I promised to send him some photos when I finished the walk, but I later realised that only he has my contact and I don’t have his, so I can’t send any. (Max, if you read this, say hi!)

There are several trails leading away from the summit of 555 Peak. I took this one, which is on the left as you approach the clearing. It’s also the only one which continues heading up.

Hikers silhouetted on the trail ahead of me.

By this point, you’ve climbed up higher than Mount Keelung.

If you look carefully at the centre of the previous picture, you should be able to spot this huge concrete chimney jutting incongruously out of the trees. It’s just one of the many relics left behind by the region’s mining and smelting past.

There are another couple of sections along here that require your full attention.


Sawtooth Ridge (鋸齒), or Peak Serration, if you prefer, is one of those spots that needs extra care. If you want to find the peak marker, you need to head to the right of the ridge, but in order to continue the journey, you’ll need to head to the left.

There are two ways to make it across this section. Either by grabbing onto the rope that goes directly across and just hoping for the best, or else abseiling down to walk along the bottom of the exposed section. I chose this second option since it seemed safer.

The rest of the climb ducks in and out of tree coverage.


And the very last part of the climb has been upgraded with a tightly secured metal chain. This spot is the junction between Mount Banping (straight over and up) or Teapot Mountain (down to the right). I’ve climbed Mount Banping in the past and didn’t plan on doing so again on this occasion, so took the trail on the right.

There is a bit of a bottleneck at this point of the trail and I had to wait for a hiking group to climb up before I could start heading down.

From this angle, it is very easy to see why Mount Keelung is also nicknamed Big-Bellied Beauty Mountain.


My visit in early December coincided with some of this year’s best silvergrass viewing opportinities. The blooms were dry and fluffy after several days without rain, and they snared the afternoon sunlight so prettily.

Once you have made your way over the span to the base of Teapot Mountain’s rocky outcrop, you can choose whether to cut around the left side of the teapot, or else head straight up. I opted to climb it, because why not?

If you turrn back to look at where you’ve just come from, you can make out the heart-shaped scree slope just below and to the left of the path.

From on top of the teapot, you can look down on the nearby town of Jinguashi, and make out the sprawling graveyards of Jiufen a little further away.


To get down from the teapot, you’ll need to scramble up and over this rock using the chain and foothold provided, then down through an opening in the rocky structure. I hate this section when its busy because I always feel claustrophobic and like people don’t give you enough space, but it was fine on a less busy day.

Once you’ve made it down to the far side of the teapot, things get a lot easier.


You can follow the Teapot Mountain Trail all the way down to the road (and smugly laugh to yourself when you see people heading up complain about how difficult it is).


At the junction, turn left and keep heading down, then at the end of the trail, turn left again onto the road.

When you reach the pavilion on the right here, turn right and head down the steps.


The steps take you back across the road. Then, at the next junction, take another right.


The steps eventually reconnect with the road for a final time. Here, turn left and follow the road (or take a shortcut through the tunnel) to arrive at the Teapot Mountain carpark.


From the carpark, take a left turn down the road leading to Quanji Temple. I popped into the temple to get some water, and by the time I’d done that, the bus was just about ready to go. The bus doesn’t pick people up from the bus stop that you can see in the second photo here, but just a little further downhill to the right.
HOW TO GET TO STEGOSAURUS RIDGE
Google Maps address: The current most popular trailhead can be found at Nanya. There’s a free carpark here beside the harbour, and at the top end, there’s another paid carpark by Quanji Temple, but since this is a point-to-point hike, you might find it better to use public transport.
GPS location:
- Nanya trailhead – N25 07.205 E121 53.240
- Teapot Mountain trailhead – N25 06.69 E121 51.695
Public transport:
- Getting to the start – Take the train to Ruifang then walk a few minutes to catch the 886 Tourist Shuttle service from Ruifang Train Station (District Square). Alight at Nanya (Nanxin Temple).
- Returning from the end – Catch the 1062 from Quanji Temple. This bus will take you all the way back to Zhongxiao Xinsheng MRT Station, but if you prefer, you can get off at Ruifang Station and catch the train back from there.
STEGOSAURUS RIDGE TRAIL MAP
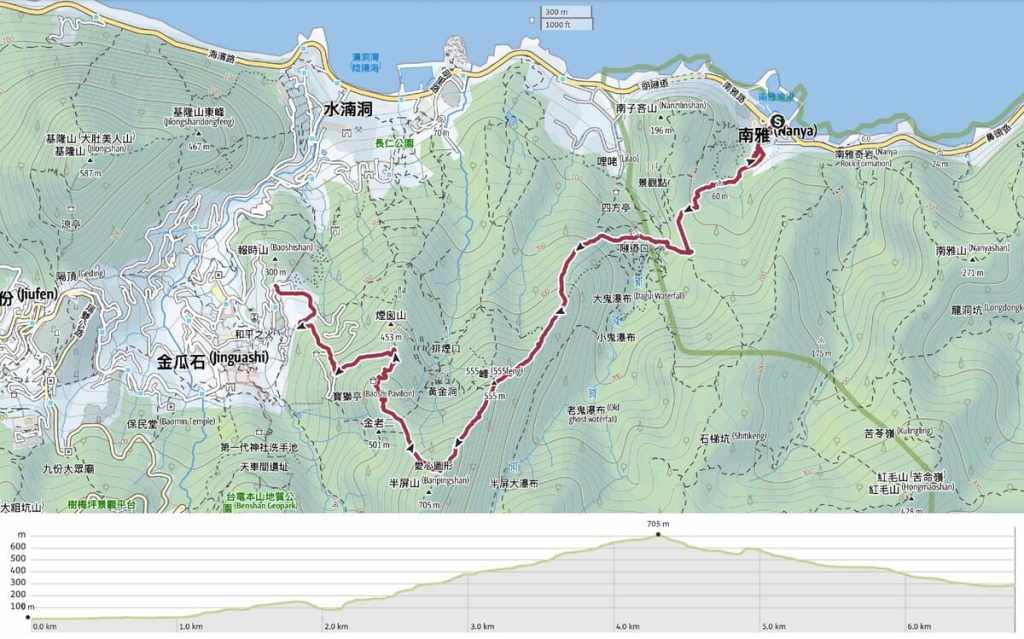
GPX file available here on Outdoor Active. (Account needed, but the free one works just fine.)
If you enjoy what I write and would like to help me pay for the cost of running this site or train tickets to the next trailhead, then feel free to throw a few dollars my way. You can find me on PayPal, Buy Me a Coffee or Ko-fi, (and if you’re curious about the difference between the three you can check my about page).

looks lovely
LikeLiked by 1 person
This one is one hell of a fantastic walk as long as you’re suitably prepared, otherwise it would probably be hell in a whole other sense!
LikeLike
I love this hike! Just did it once though. You’re post inspired me to do it again soon!
LikeLiked by 1 person
I hope you have a great time! I really like this hike too.
LikeLike
It looks amazing!
LikeLiked by 1 person
This is definitely up there as one of the best day hikes in northern Taiwan. The views are outstanding!
LikeLike
We hiked this trail this Oct. 29, 2024. Fantastic trail and vistas! However, after we reached 555 Peak and descended from there, we got totally lost as two separate landslides obliterated the trail going to Teapot Mountain. We managed to cross the two landslide areas and managed to find FuXingShan then the trailhead to the Teapot Mountain where there is a road. Also, I think some segments along the Stego ridge itself are missing ropes. We are fortunate to have made connecting paths through the landslides, but cannot recommend this trail until these broken trail issues are fixed, for safety.
LikeLiked by 1 person
Hi, Derick. Thanks for the heads up on this. I’m glad you were able to course-correct and find a way out. Do you think you’d be able to pinpoint the landslide areas on a map? Someone else has asked me about the viability of walking all the way up Stegosaurus Ridge and over Mount Banping, but I haven’t been there myself for a while so I’m really not sure what to say to them. (I believe the unroped sections were likely always unroped, there wasn’t rope the whole way both times I’ve walked this route.)
LikeLike
Hi! We descended from 555 Peak instead of going further up to Peak Serration as you described above because we were worried about the weather (though we had light rain so far up to this point but clouds looked dark and heavy and thick fog covered the tip of BanPing). After about 30 min from our descent from 555 Peak, the trail was completely obliterated by landslide which seemed fairly recent. The group decided to actually cross this landslide area (about the width of a two-lane road); crossing it required butt shuffling sideways because the ground was loose and slippery even when it was not wet. We saw red ribbons on the other side of this landslide so we knew we were somehow still on track. The landslide came from higher up so we don’t know if the same landslide would have covered the trail if descending from higher up say, Serration Peak. We continued further and encountered a another, wider landslide region. We tried to cross it as well but we were not successful finding the trail on the other side so we bum-shuffled down along this very landslide until we found another ribbon on the other side and followed it. It then led us to what we believe is the slope of Mt. Fuxingshan, and shortly after, found the trailhead to the TeaPot Mountain. We did not further climb Teapot mountain.
We don’t know if the 2 landslide areas could have been avoided by hiking higher to BanPing then to Teapot. We cannot also recommend repeating our track because it was quite difficult finding the correct trail. Certainly, the treak from Nanzilin trailhead up to the 555 Peak can still be done two-way without much problems.
LikeLiked by 1 person
Thank you so much for taking the time to write such a detailed description of the current conditions. This kind of information is invaluable to others hoping to walk it.
LikeLike
My husband and I are thinking of heading to stegosaurus ridge around Christmas. We have to cancel the trek last yr cos it was raining.
We have bought our air tickets to Taiwan before we saw this update that teapot mountain is close.
Can we still do stegosaurus ridge but do a U turn at Peak Serration back to the start or maybe exit via Mt Banping instead of Teapot?
LikeLiked by 1 person
Hi there. I haven’t been in the area since the storms that caused the damage, so I can’t offer a definite answer one way or the other. However, the most recent comment on this post from another hiker offers some very good information that you might find useful in your planning. Another tip is to check these locations on both Google Maps and Instagram to see what the latest posts are saying. That is generally pretty accurate.
LikeLike
The trail is open, the peak at Teapot is closed but we didn know that and it anyway.
LikeLiked by 1 person
*and did it anyway:)
LikeLike
Thanks for the confirmation. I figured as much based on recent sightings from another trail. Did you just skirt around the side of the teapot?
LikeLike
Hello, did this trail today for 6hrs and urge anyone hiking in summer to bring at least 4 litres of water. I brought 3.2 litres, finished it all and got dehydrated at the end. My life flashed in front of me while trying to ascend towards the serration point.
The trail ending with teapot mountain is ok to hike now. Just go all the way to the top and enter the cave and head down. Someone has placed ropes now and you will be able to exit from the cave entrance towards Quanji temple.
And really, hike with someone experienced with this trail. Going solo for your first time can be dangerous.
LikeLiked by 1 person
That’s some good advice re water needs and not going solo. Thanks for stopping by to let others know (I think people are more likely to take it seriously when it’s a reader’s feedback). You must have masochistic tendencies to even consider this from June to August! It must have been absolutely roasting up there.
And thanks for the tip regarding Teapot Mountain.
LikeLike
It was ABSOLUTELY roasting indeed. I’ve hiked through the summer but this ridge is next level sun tanning. The pictures on a clear day is stunning, just that the photographer is roasting haha.
LikeLiked by 1 person